Search This Blog

Tuesday, August 28, 2012

Dear Lizzy Day 2!

 Day two of Jo's Dear Lizzy Extravaganza! 
 Happy Birthday! Ice cream cone card

Make card frm green cardstock.  Cut a slightly smaller rectangle of Dear Lizzy Neapolitan "First Date" paper, and adhere to the card front.
Using a scallop border punch, cut a strip each of "Twinkling Lights (rev)", "Lucky Laugh (rev)", and "Sweet Sundress (rev)" patterned papers.  Wrap green ribbon around strip and tie in a bow.  Tie a bow of green and white twin over ribbon,  Adhere these strips to the card front.
Cut a white rectangle and a slightly larger green scalloped rectangle and layer.  Stamp icecream stamp onto brown, green and light green cardstock using brwn ink.
Cut cone out of brown cardstock.  Cut icecream only out of light green and darker green cardstocks.  Dot brown marker onto dark green icecream to lok like choc chips (yum!). Adhere icecream and cone on white rectangle.  Adhere Kaisercraft red pearl onto the top of the icecream to look like a cherry.
Punch a file tab shape from dark green cardstock and stamp "happy birthday" in dark brown ink. Tuck punched shape under the scalloped rectangle and adhere to the card front.

Monday, August 27, 2012

2 weeks of Dear Lizzy Deliciousness!

The very talented Jo has been busy busy busy! She has created a bumper stack of cards from the Dear Lizzy Neapolitan collection - I'll be sharing one of her fabulous creations each day for the next 2 weeks!
Jo was also kind enough to share instructions so you can recreate this at home!
Make card base from yellow cardstock.  Round right hand corners of card.  Cut smaller yellow rectangle panel and round right hand corners.  Run through a woodgrain embossing folder and adhere to the front of the card.
Cut a spellbinders labels 1 diecut from brown cardstock and run thrugh the swiss dots embossing folder.  Distress the edges of the die cut and trim the left hand side to fit ont the card front as shown.
Cut a spellbinders scalloped circle from orange cardstock.  Cut a classic circle to fit neatly inside this from white cardstock - cut zig zag strips from various dear lizzy papers and adhere to the white circle. Carefully trim off the excess. Layer this onto the orange circle, and then onto the brown cardstock layer.
Adhere orange and white gingham ribbon to the left edge of the card.  Using various strips of dear Lizzy Neapolitan papers, layer these over the ribbon for a textural effect.
Stamp "Hello friend" in brown ink onto sweet sundress paper.  Punch out and punch again from orange cardstock. Layer sentiment over orange shape to give a shadow effect.
Tuck the punched sentiment under an orange felt flower.  Tie green and white twine through a brown button and adhere to the flower.

Check back tomorrow for more Dear Lizzy Neapolitan fun!

Sunday, August 26, 2012

Elegant...

Hi Everyone! It's been a bit crazy around my neck of the woods, sorry for neglecting the blog for so long, but I have returned to full time work and am now squeezing all this in in my spare time :)

We recieved this fabulous layout from the super talented Veronica - who knew you could get so much texture by thinking a little bit "outside the box"!
I love how the whole layout pulls together... makes me long for the long hot days of summer! 
This layout uses another Bo Bunny paper – this time Welcome Home Portrait. I fussy cut some swirls from the reverse side and inked the edges. To a white piece of bazzil, I’ve added modge podge and tissue paper, then torn off the excess. When this dried, I spritzed with glimmer mist, swiped a pigment ink over the raised rumpled pieces, then added a little fine glitter while the ink was wet. I used a colour close to the bricks in the photos to add some contrast to the colour of the mist and water in the photos .
I’ve taken a swirly stamp and randomly stamped with archival ink over the page. I used just the stamp – no stamping block, and this helped create the unstructured look. The raised parts of the tissue paper picked up more stamping than the lower parts. Next I added random pieces of Idea-ology tissue tape, collage style around the page to help ‘anchor’ the look of the texture.
To help suggest the home pool, I’ve added a fence cut from Bo Bunny Double Dot Chocolate Vintage. Then I’ve added a Dusty Attic wrought iron chippie and coloured this with two tones of metallic paint. I’ve also used this paint on the Thickers title.
In pulling it all together, I’ve used quite a bit of foam tape to layer, add dimension and raise above the texture of the tissue paper.

Monday, July 16, 2012

Port Arthur - Layout by Pieta

The next layout Pieta has done, also using the Saturdays collection by Little Yellow Bicycle is a fun layout of a photo taken on holiday!
I used Little Yellow Bicycle - Saturdays - Pants & Patches as the background paper.  Matting – first matt very thin border of off white cardstock with inked edges and again used the wood grain reverse of LYB - Saturdays - Cottage Dreams for the next much wider matt.  Edges distressed with distressing tool and inked.  Next matt Tim Holtz Coredinations Cardstock in Faded Jeans with sanded edges to make it look like worn denim.  
 
 The Journaling items are again from the tag book.  Chipboard key and big letters are TH grunge board that I had in my stash the little key and padlock charms also from my stash and the chain and jump rings came from the bead section of Spotlight or Lincraft or somewhere like that.  The mini letters from my stash and the rest of the Port Arthur letters cut with cuttlebug.  
The two lookalike playing cards came from Port Arthur as part of your entry fee and I have kept them as a souvenir.


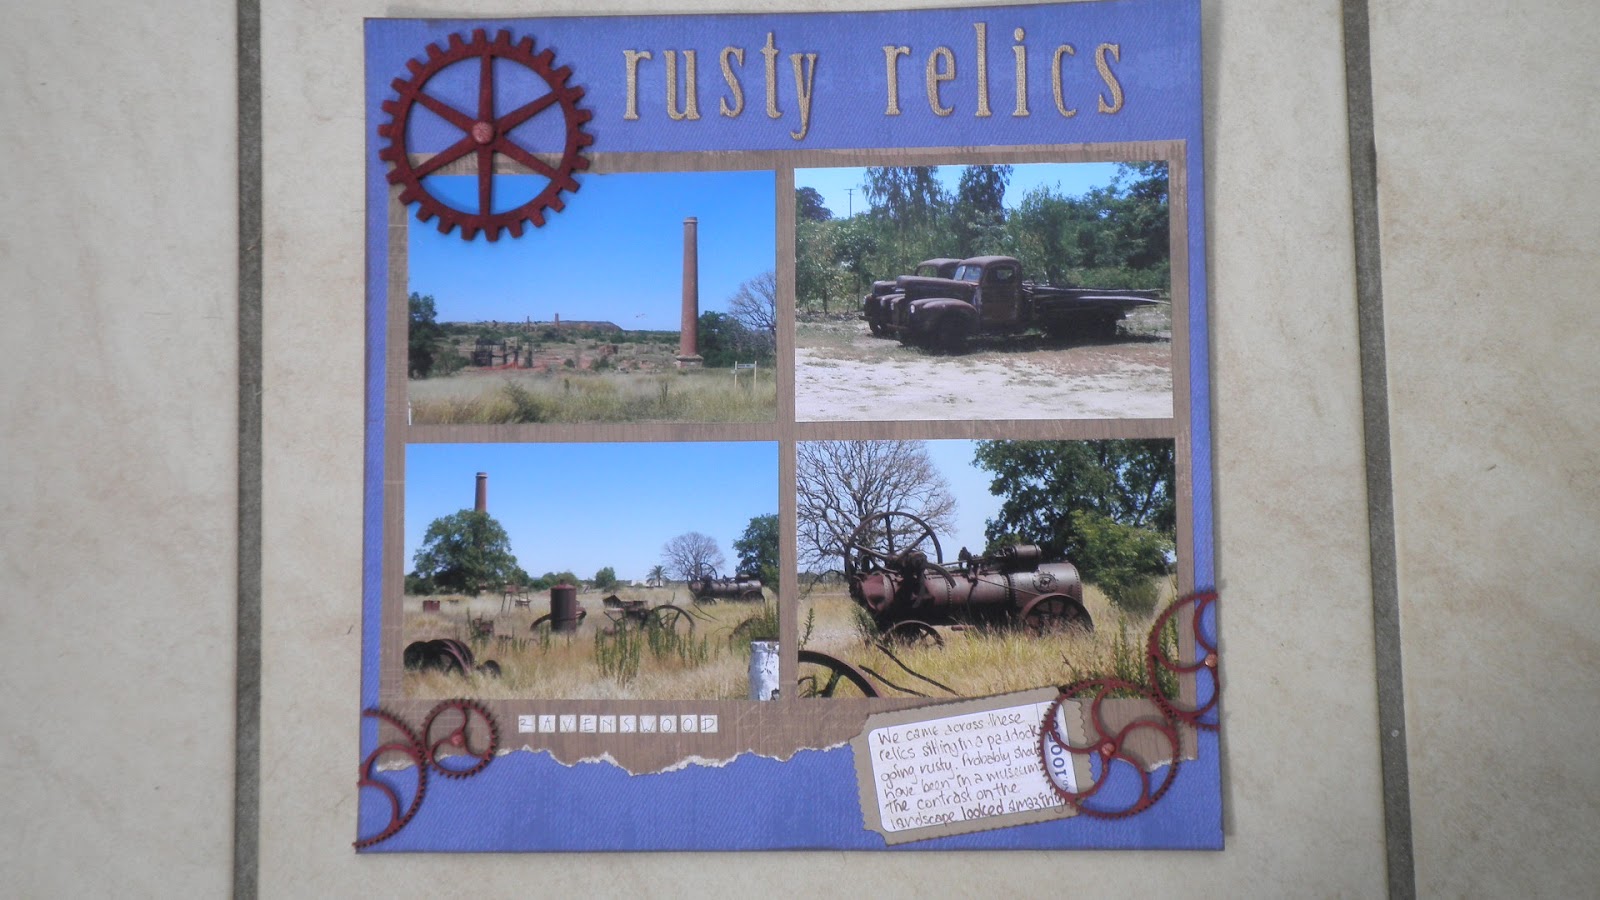
Rusty Relics - Layout by Pieta

Rusty Relics Layout by Pieta! I just love the photography as well as how this layout pulls together to be just perfect! 

Background paper is Little Yellow Bicycle - Saturdays - Enjoy the Ride – I used the reverse side which was a nice denim blue colour and texture and seemed to contrast well with the rust!  The photos are not matted individually but all onto a big piece of LYB - Saturdays - Cottage Dreams - which was torn at the bottom – once again the reverse side which had a lovely rustic wood grain effect. 

The cogs are a combination of Dusty Attic & Kaisercraft so I could get several different sizes and are coloured with Tim Holtz Mahogany Distress Stain and makes them a lovely rust colour.  The brads in the middle were just plain silver ones which I painted a rust colour to give a coating them put a blob of tea dye crackle paint (crackle would not stick directly on to the brads) to try and give a weathered rusty flaky look, then once this was dry I darkened it with the mahogany distress stain again. 

Letters were Jillibean Soup Burlap Chipboard Alphabeans and the burlap suited the rustic colours of the page. 

Journaling tag was out of the  LYB - Saturdays - Tear-Out Ticket & Journaling Card Booklet.


To be honest, if I had looked at these papers myself I don’t think I would have picked them, and when I first saw them struggled a bit to get something happening with them but was determined to not to let them beat me and I am happy with how they have turned out.

Friday, May 18, 2012

Michele & Ritas Mothers Day Cards!

Here's Michele's Mothers day card - she drew inspiration from the Mason Jars to create this cute card.  Like Jo, Michele used the Dear Lizzy Neapolitan Collection!

My Mothers Day card drew inspiration from the soft nature tones of the photo - I went a little more abstract, but created this layered card using spellbinders dies, and couture creations embossing folders, kaisercraft roses and wood flourishes, all adorned with a generous dash of diamond dust!
Don't forget there's still a few days to join in the challenge - it doesn't have to be a mothers day card at all! :)
Happy Scrappin'
Rita

Sunday, May 6, 2012

Mothers Day Card Challenge

Jo has kindly offered to help us out by running a cardmakers challenge for us!

We'd love for you to join in! Please make Jo feel welcome here on our little blog - all comments are enjoyed and appreciated! 


Welcome everyone to the first of many card makers challenges that I'll be running on here.  The idea behind these challenges is to stretch your creative muscles and try something new.  Every few weeks or so I’ll be giving you a challenge and it’s up to you how you interpret the challenge to create a card!

The challenge will vary; it might be an inspiration photo, a colour scheme, a sketch, a technique, supplies, etc.  Feel free to interpret the challenge your own way and substitute where necessary.  The idea is to have fun with it so there are no hard and fast rules.  With each challenge, I’ll show you the card that I came up with using the challenge inspiration as a jumping off point.  Please link your creations here so we can all see.  We can’t wait to see everyone’s creativity and individuality shining through!

To kick off our very first challenge, I thought I’d give you an inspiration photo and ask you to make a Mother’s Day card.  Take a look at the photo and see what inspires you and how that dictates what direction you’ll take.  Maybe it’s the colours, shapes, texture or even the feel of the photo, etc.  There truly is no right or wrong!  If you have your Mother’s Day card already sorted, perhaps make a card for someone who is like a mother to you, or even your best friend!  Who doesn’t like getting some happy mail for no reason?

Back to the photo - I was inspired by the colours and the beautiful mason jars.  Mason jars are a big trend in the scrapbooking/cardmaking world at the moment.  The beautiful patterned papers in the Dear Lizzy Neopolitan range from American Crafts fit the bill perfectly for me.  
Here’s my card for the inspiration challenge!  I hope I’ve given you a nudge to have a go and share your creation with all of us.

The closing date for this challenge will be the  20th of May - that'll give you enough time to make a card for Mum (or Grandma!) snap a photo of it, give the card and then upload it so you don't ruin the surprise!
To "Link" to this blog post, upload a photo to facebook, flickr, photobucket, picasa or any photo sharing website and then copy and paste a link into the comments section.  

I can't wait to see what everyone comes up with!